Container Image Creation Manual
Platform Container Image Creation Documentation
1. Base Images
Base images require installation of essential deep learning components such as CUDA and cuDNN. If the created image has no specific requirements for the OS version (official images use the latest OS), cuDNN version, and requires Ubuntu, you can download the base image with the specified CUDA version from the NGC website. Refer to Section 1.1.
If the image's OS version is CentOS, or if specific CUDA/cuDNN versions are required and NGC does not provide such a base image, you must create a custom base image meeting the specified OS or CUDA version requirements. Refer to Section 1.2 for details.
Note: Image creation must be performed online in a networked environment. Due to the numerous dependency packages related to components, offline installation via downloaded packages is not recommended. This document focuses on online image creation and provides commands for offline component installation.
Since the OS in the images is the MINI version, some shared libraries or component dependency packages are not automatically installed when customizing components online. During actual image creation, refer to this document to install required shared libraries or dependency packages. Contact us if you encounter difficult-to-resolve issues.
Build the container image using a Dockerfile. If the build does not ultimately fail, ignore any red output displayed during the online build process, as this does not affect the final container image.
This document uses a customer-customized container image as an example. Customization requirements:
Operating System: CentOS 7.4
numpy==1.15.4
opencv-python==3.4.3.18
tenserflow-gpu==1.8.0
Keras==2.2.4
python3.6.6
cudnn 7.0
cuda9.0
1.1 NGC Official Base Image
For Ubuntu-based CUDA base images, download from the NGC official website. Separate builds are generally unnecessary and are only required for CentOS versions.
NGC Official Base Image Download URL:
https://ngc.nvidia.com/catalog/containers/nvidia:cuda/tags
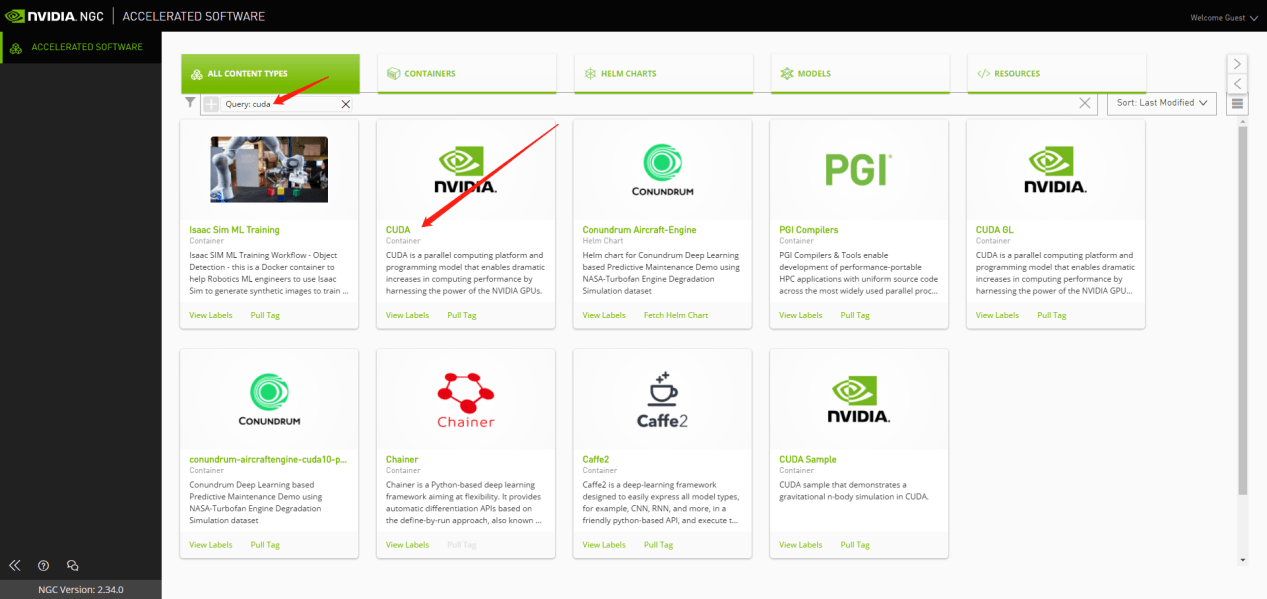
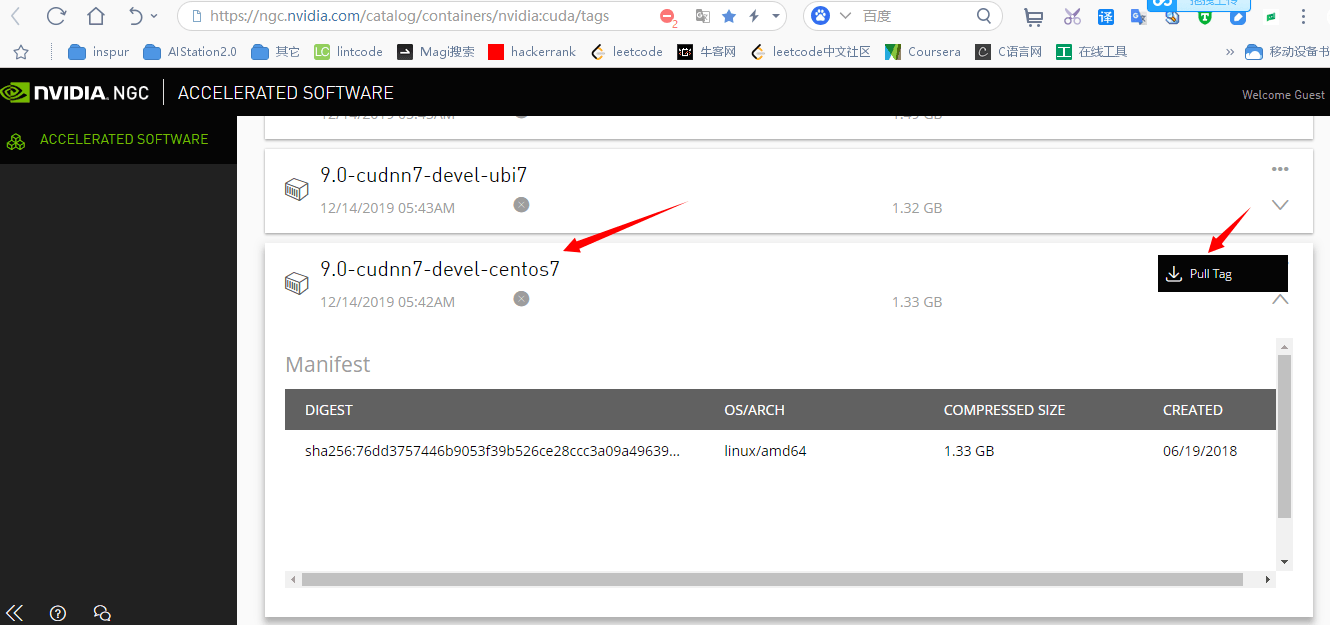
Click 'Pull Tag' to obtain the pull command for the required base image: docker pull nvcr.io/nvidia/cuda:9.0-cudnn7-devel-centos7

1.2 Custom Base Image with CUDA
Since the customer-specified operating system is not available in NGC official images, a custom base image must be created.
1.2.1 Download Dockerfile
Download the Dockerfile and cuda.repo for the specified CUDA version and operating system, then modify the Dockerfile. https://gitlab.com/nvidia/container-images/cuda/-/tree/master/dist (Requires proxy access)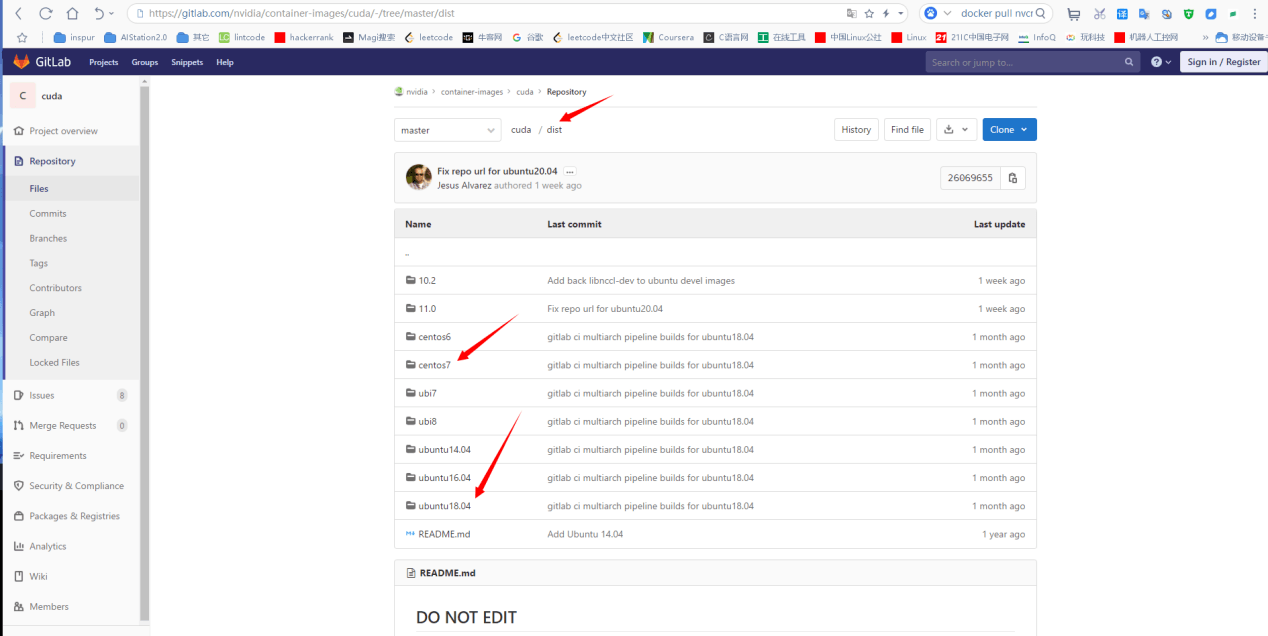 Click 'CentOS 7' to select the CUDA version, then choose CUDA 9.0.
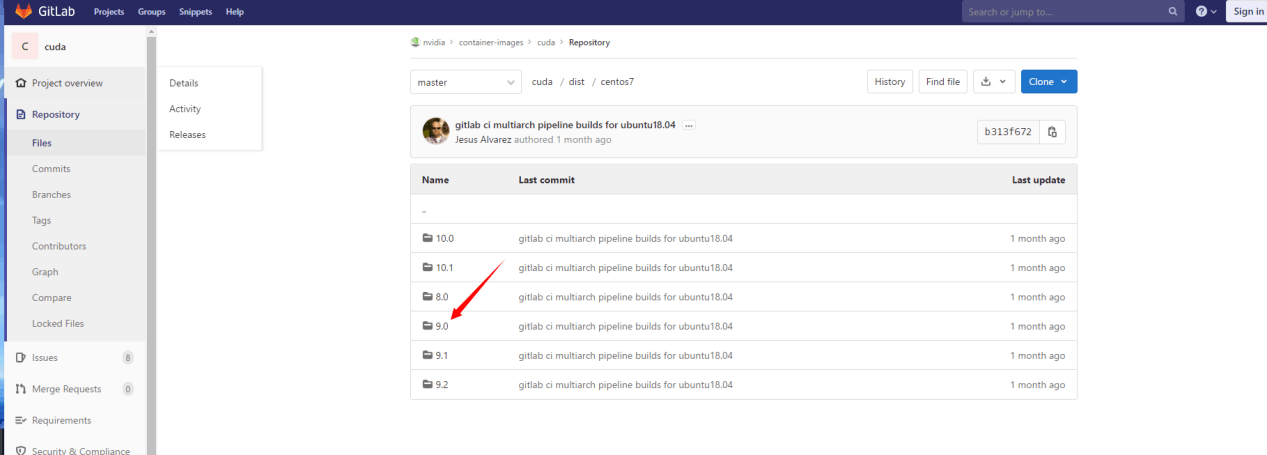
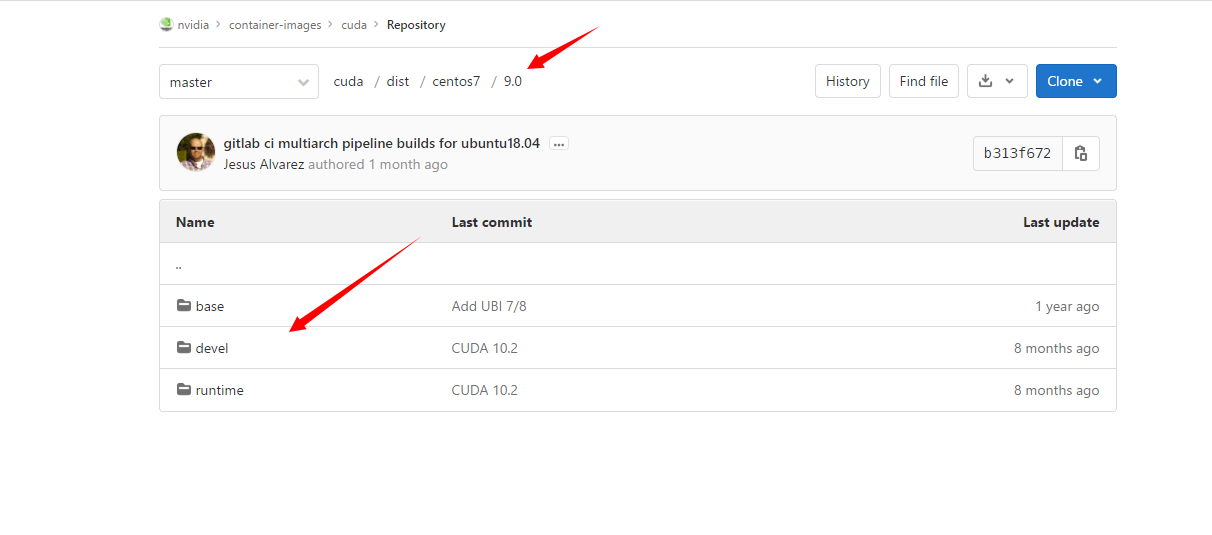
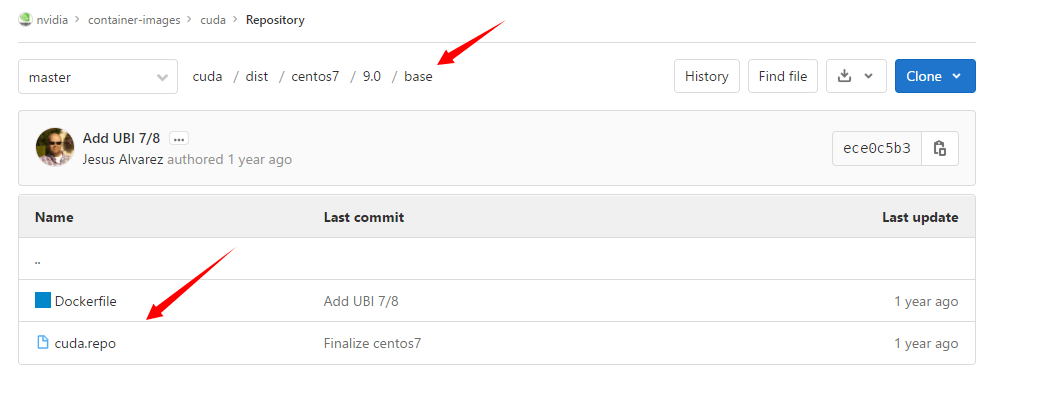
After downloading, as shown in the figure: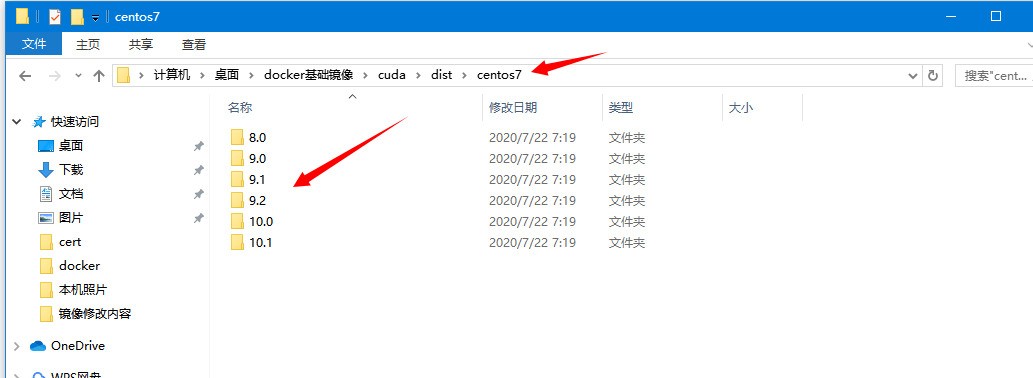 Under the GitLab CUDA 9.0 directory, there are base, devel, and runtime directories. We need to consolidate the Dockerfile from each into a single Dockerfile to create a comprehensive CUDA image, preventing issues during GPU training. The official explanations for base, devel, and runtime are as follows:
 CUDA images come in three flavors and are available through the NVIDIA public hub repository.
base: starting from CUDA 9.0, contains the bare minimum (libcudart) to deploy a pre-built CUDA application. Use this image if you want to manually select which CUDA packages you want to install. runtime: extends the base image by adding all the shared libraries from the CUDA toolkit. Use this image if you have a pre-built application using multiple CUDA libraries. devel: extends the runtime image by adding the compiler toolchain, the debugging tools, the headers and the static libraries. Use this image to compile a CUDA application from sources.
1.2.2 Modify Dockerfile
Consolidate all Dockerfiles under CUDA 9.0 into a single Dockerfile, keeping only one instance of duplicate content. The consolidated Dockerfile content is as follows:
Dockerfile:
FROM centos:centos7.4.1708 ## Replace with custom OS version, refer to 1.2.3 LABEL maintainer "NVIDIA CORPORATION cudatools@nvidia.com"

RUN NVIDIA_GPGKEY_SUM=d1be581509378368edeec8c1eb2958702feedf3bc3d17011adbf24efacce4ab5 &&
curl -fsSL https://developer.download.nvidia.com/compute/cuda/repos/rhel7/x86_64/7fa2af80.pub | sed '/^Version/d' > /etc/pki/rpm-gpg/RPM-GPG-KEY-NVIDIA &&
echo "$NVIDIA_GPGKEY_SUM /etc/pki/rpm-gpg/RPM-GPG-KEY-NVIDIA" | sha256sum -c --strict -

COPY cuda.repo /etc/yum.repos.d/cuda.repo

ENV CUDA_VERSION 9.0.176

ENV CUDA_PKG_VERSION 9-0-$CUDA_VERSION-1 RUN yum install -y
cuda-cudart-$CUDA_PKG_VERSION &&
ln -s cuda-9.0 /usr/local/cuda &&
rm -rf /var/cache/yum/*

## nvidia-docker 1.0 LABEL com.nvidia.volumes.needed="nvidia_driver" LABEL com.nvidia.cuda.version="${CUDA_VERSION}"

RUN echo "/usr/local/nvidia/lib" >> /etc/ld.so.conf.d/nvidia.conf &&
echo "/usr/local/nvidia/lib64" >> /etc/ld.so.conf.d/nvidia.conf

ENV PATH /usr/local/nvidia/bin:/usr/local/cuda/bin:${PATH} ENV LD_LIBRARY_PATH /usr/local/nvidia/lib:/usr/local/nvidia/lib64

## nvidia-container-runtime ENV NVIDIA_VISIBLE_DEVICES all ENV NVIDIA_DRIVER_CAPABILITIES compute,utility ENV NVIDIA_REQUIRE_CUDA "cuda>=9.0"

## runtime RUN yum install -y
cuda-libraries-$CUDA_PKG_VERSION
cuda-cublas-9-0-9.0.176.4-1 &&
rm -rf /var/cache/yum/*

## cudnn (replace with specified cudnn version, default is latest, refer to 1.2.4 for replacement) ENV CUDNN_VERSION 7.6.0.64 LABEL com.nvidia.cudnn.version="${CUDNN_VERSION}"

## cuDNN license: https://developer.nvidia.com/cudnn/license_agreement RUN CUDNN_DOWNLOAD_SUM=90659ea77734b7b671afe930c9898d21a13b888998f1dd3940cc57d6b2f29b86 &&
curl -fsSL http://developer.download.nvidia.com/compute/redist/cudnn/v7.6.0/cudnn-9.0-linux-x64-v7.6.0.64.tgz -O &&
echo "$CUDNN_DOWNLOAD_SUM cudnn-9.0-linux-x64-v7.6.0.64.tgz" | sha256sum -c - &&
tar --no-same-owner -xzf cudnn-9.0-linux-x64-v7.6.0.64.tgz -C /usr/local --wildcards 'cuda/lib64/libcudnn.so.*' &&
rm cudnn-9.0-linux-x64-v7.6.0.64.tgz &&
ldconfig

## devel RUN rm -rf /usr/local/cuda-9.0/include &&
yum install -y
cuda-libraries-dev-$CUDA_PKG_VERSION
cuda-nvml-dev-$CUDA_PKG_VERSION
cuda-minimal-build-$CUDA_PKG_VERSION
cuda-command-line-tools-$CUDA_PKG_VERSION
cuda-core-9-0-9.0.176.3-1
cuda-cublas-dev-9-0-9.0.176.4-1 &&
rm -rf /var/cache/yum/*
ENV LIBRARY_PATH /usr/local/cuda/lib64/stubs
1.2.3 Replace FROM Base Image
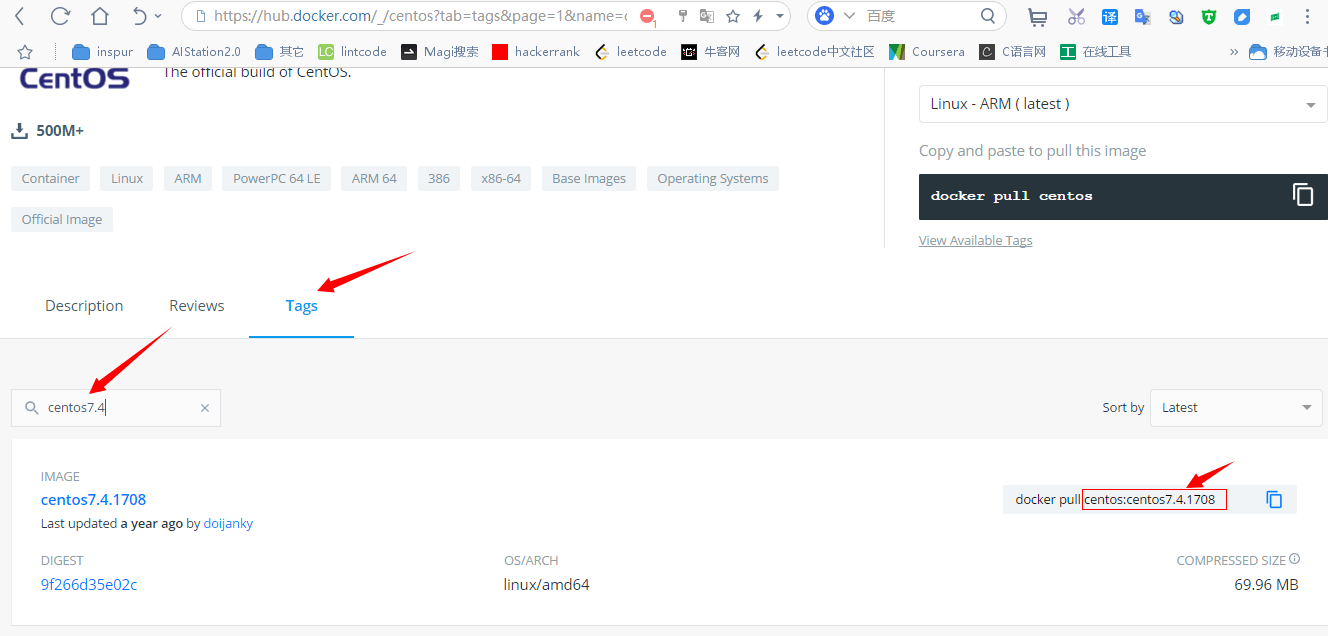
Replace the FROM operating system image in the Dockerfile with your required OS. The download URL and address for viewing OS image tags and versions are as follows:
https://hub.docker.com/ Enter 'centos' in the search box, click the first official CentOS entry, find the required OS version, and replace the FROM section.
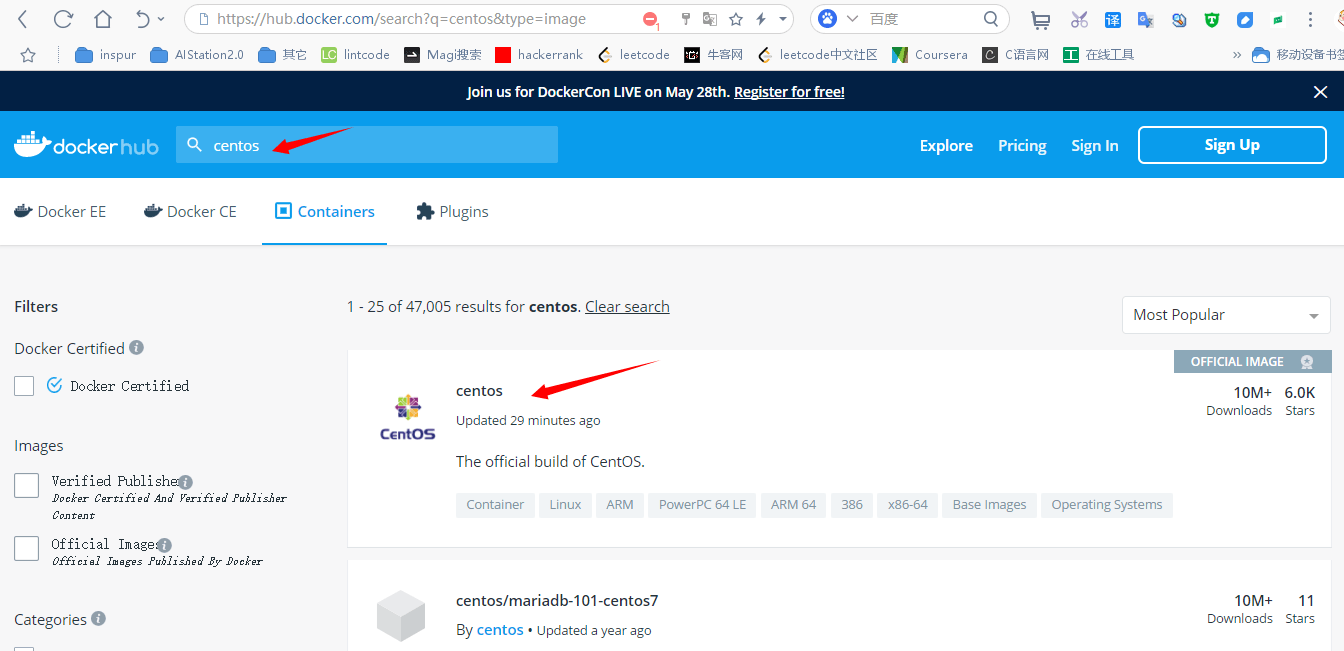
1.2.4 Replace cuDNN (Ignore if no specific version is required)
Since the official cuDNN Dockerfile always uses the latest version, you must manually locate and modify this section if a specific version is required.
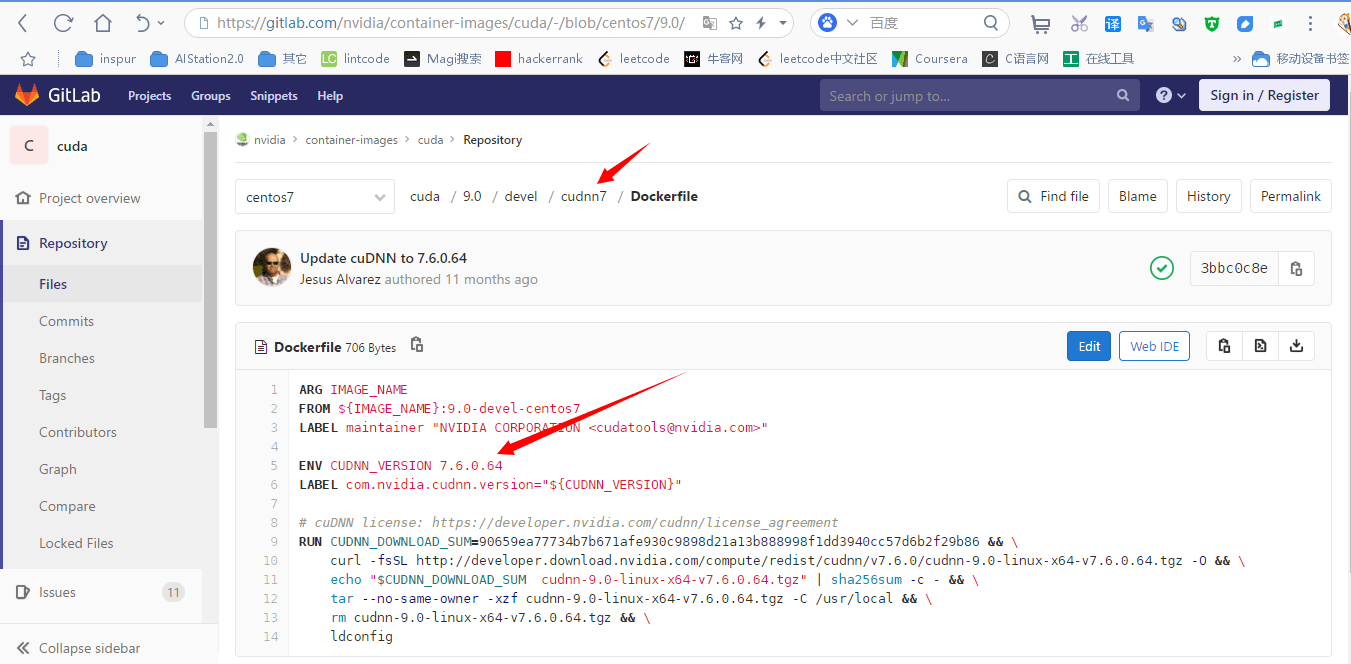 View the link for your specified cuDNN version:https://developer.nvidia.com/rdp/cudnn-archive
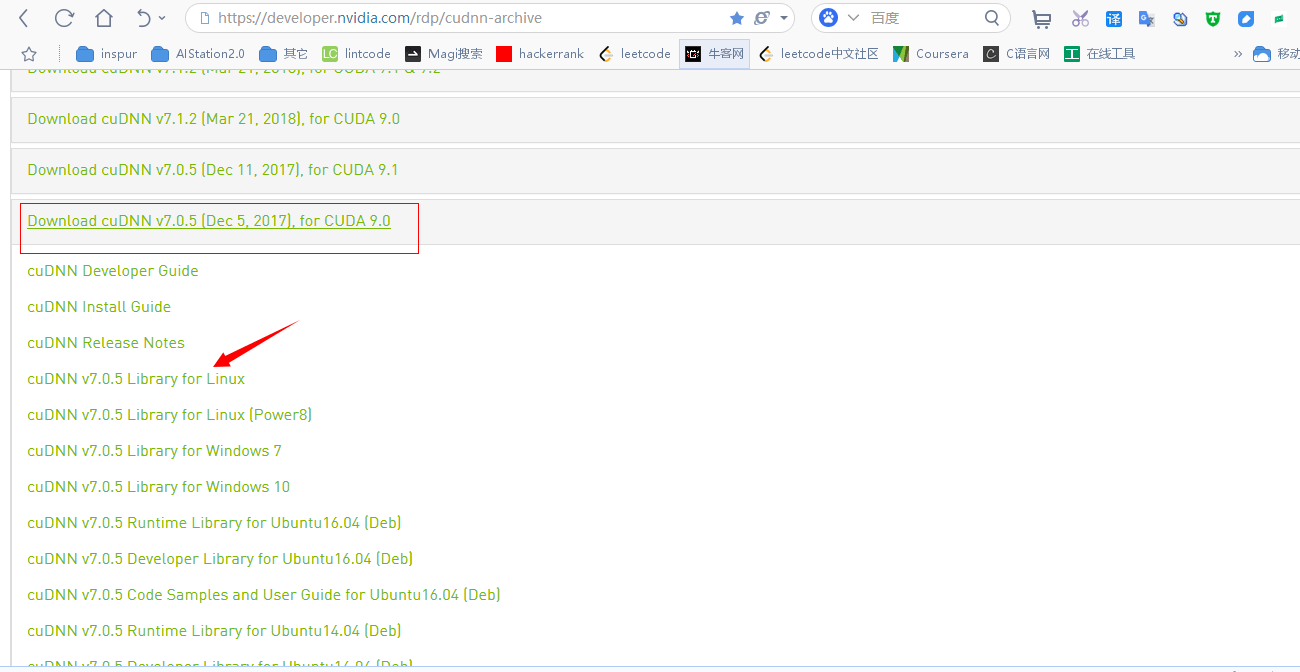 Click 'Download' to view the version number:

1.2.4.1 Online cuDNN
Modify the ## cudnn section as follows:
## cudnn
ENV CUDNN_VERSION 7
LABEL com.nvidia.cudnn.version="${CUDNN_VERSION}"
## cuDNN license: https://developer.nvidia.com/cudnn/license_agreement
RUN curl -fsSL http://developer.download.nvidia.com/compute/redist/cudnn/v7.0.5/cudnn-9.0-linux-x64-v7.tgz -O && \
tar --no-same-owner -xzf cudnn-9.0-linux-x64-v7.tgz -C /usr/local --wildcards 'cuda/lib64/libcudnn.so.*' && \
rm cudnn-9.0-linux-x64-v7.tgz && \
ldconfig
1.2.4.2 Offline cuDNN
If online download fails or is slow, use offline cuDNN. Download the cuDNN tar package and place it with the Dockerfile. Then modify the ## cudnn section in the Dockerfile as follows:
## cudnn ENV CUDNN_VERSION 7 LABEL com.nvidia.cudnn.version="${CUDNN_VERSION}"
## cuDNN license: https://developer.nvidia.com/cudnn/license_agreement COPY cudnn-9.0-linux-x64-v7.tgz /home/cudnn-9.0-linux-x64-v7.tgz RUN tar --no-same-owner -xzf /home/cudnn-9.0-linux-x64-v7.tgz -C /usr/local &&
rm /home/cudnn-9.0-linux-x64-v7.tgz &&
ldconfig
1.2.5 Other Modifications
Add 'rm -rf /usr/local/cuda-9.0/include && ' to the devel RUN section to prevent build failures. Adjust the CUDA version in this section according to your CUDA version.
1.2.6 Online Build of CUDA Base Image
## Navigate to the Dockerfile directory
cd /home/wjy/Dockerfile/cuda9.0-wjy
## build Dockerfile
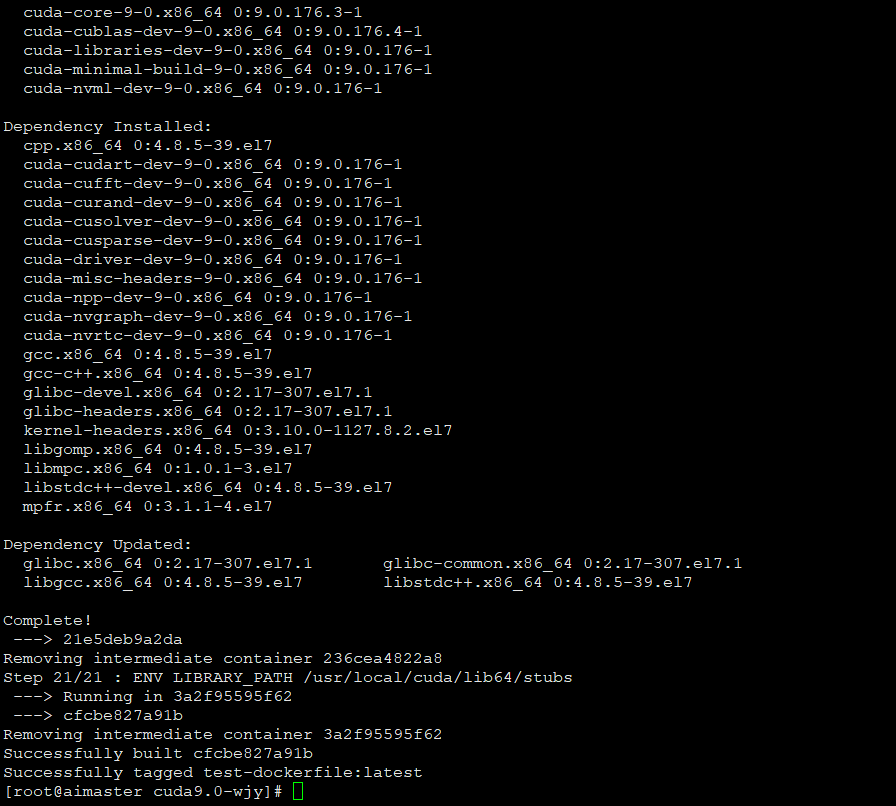
docker build -t centos7.4-cuda9.0-cudnn7.0-base-inspur:latest .
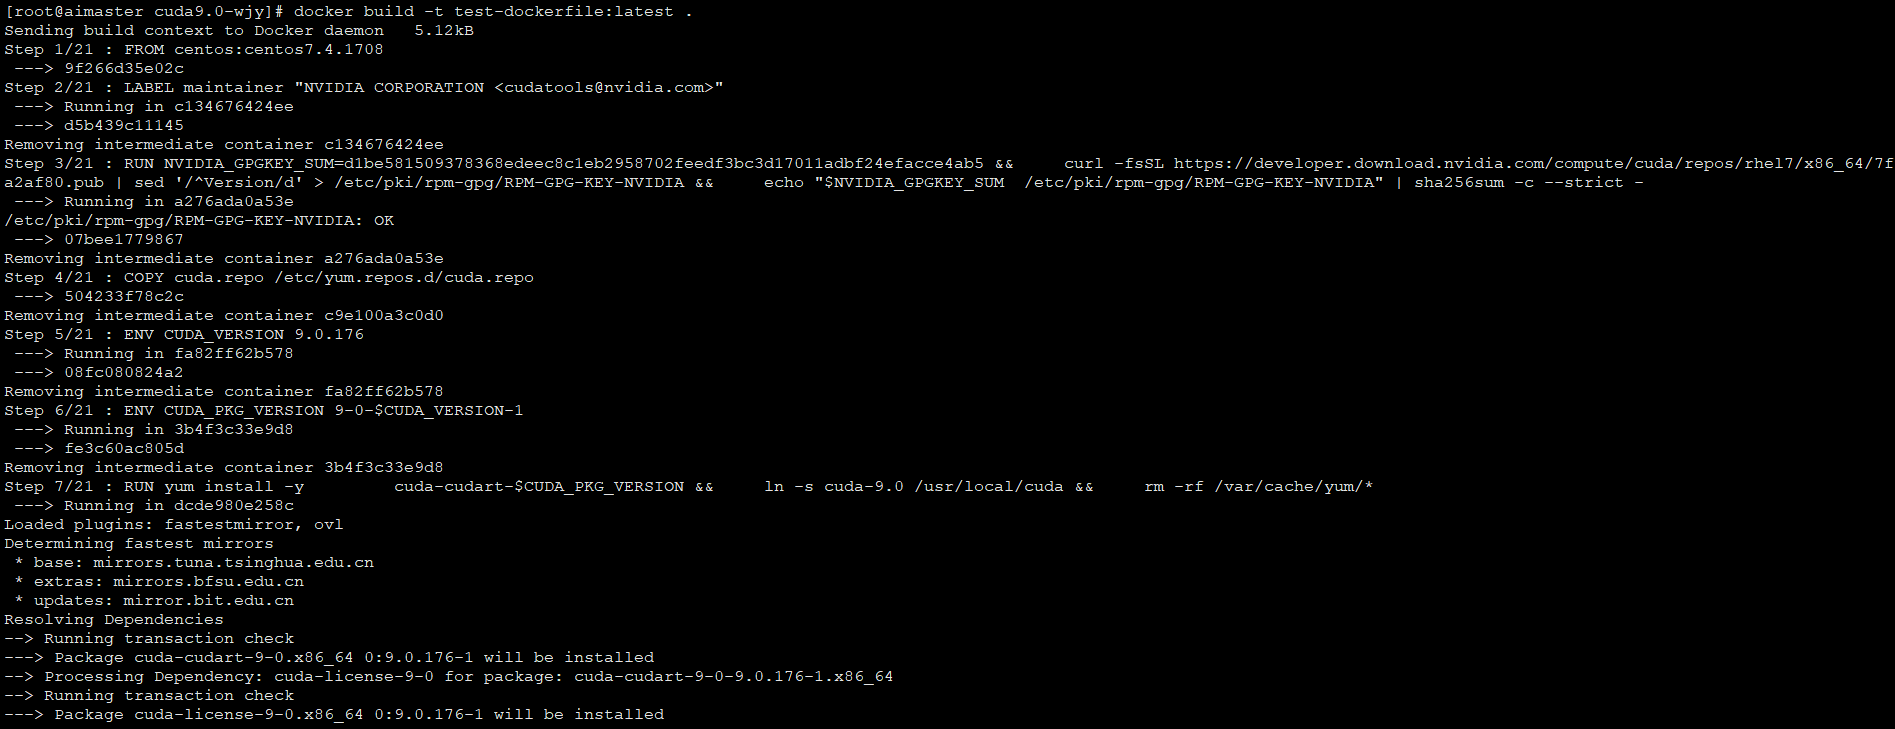
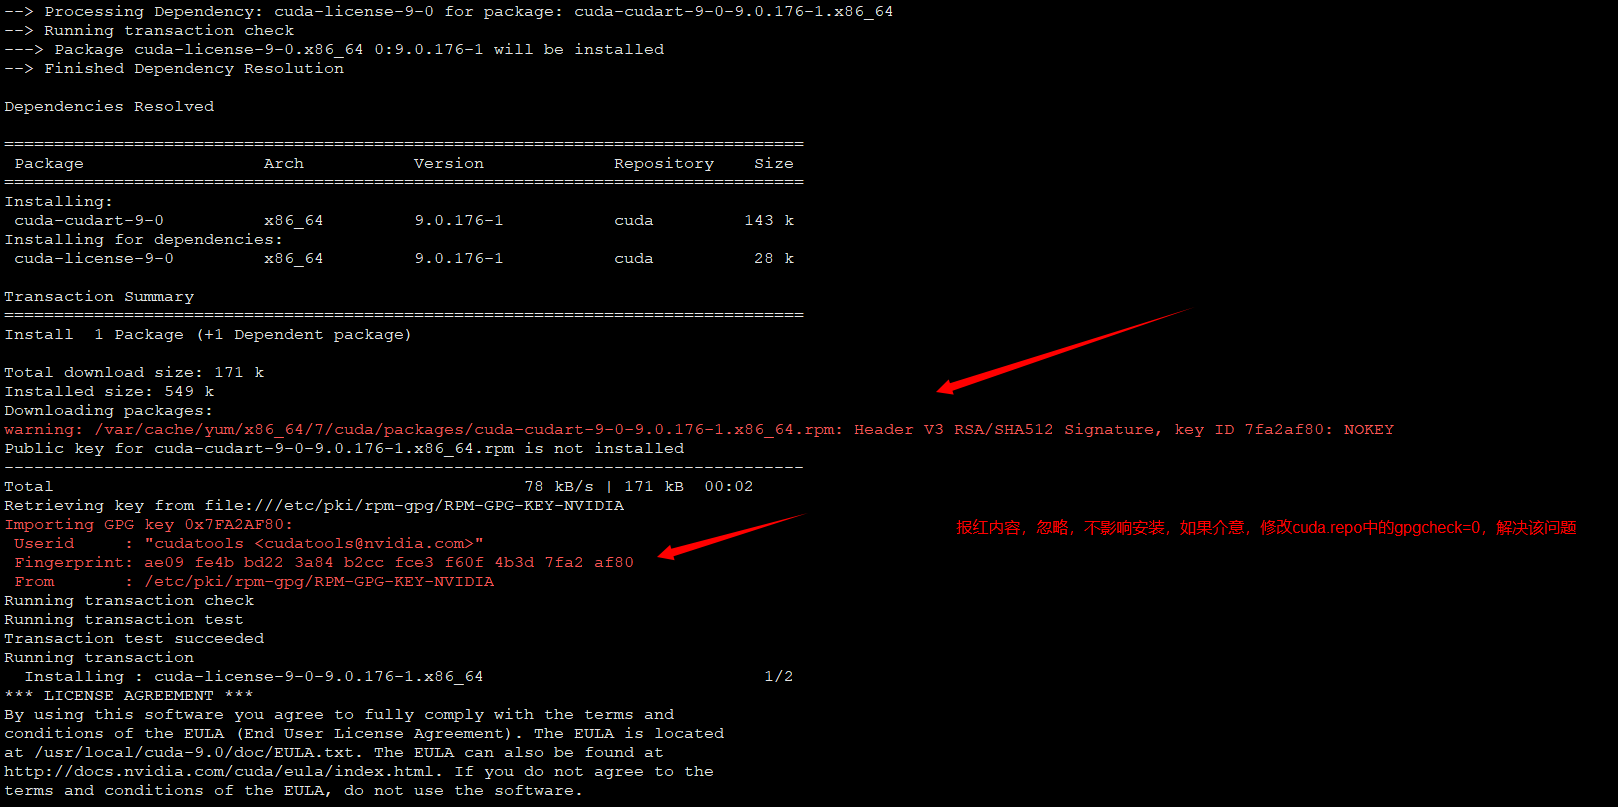
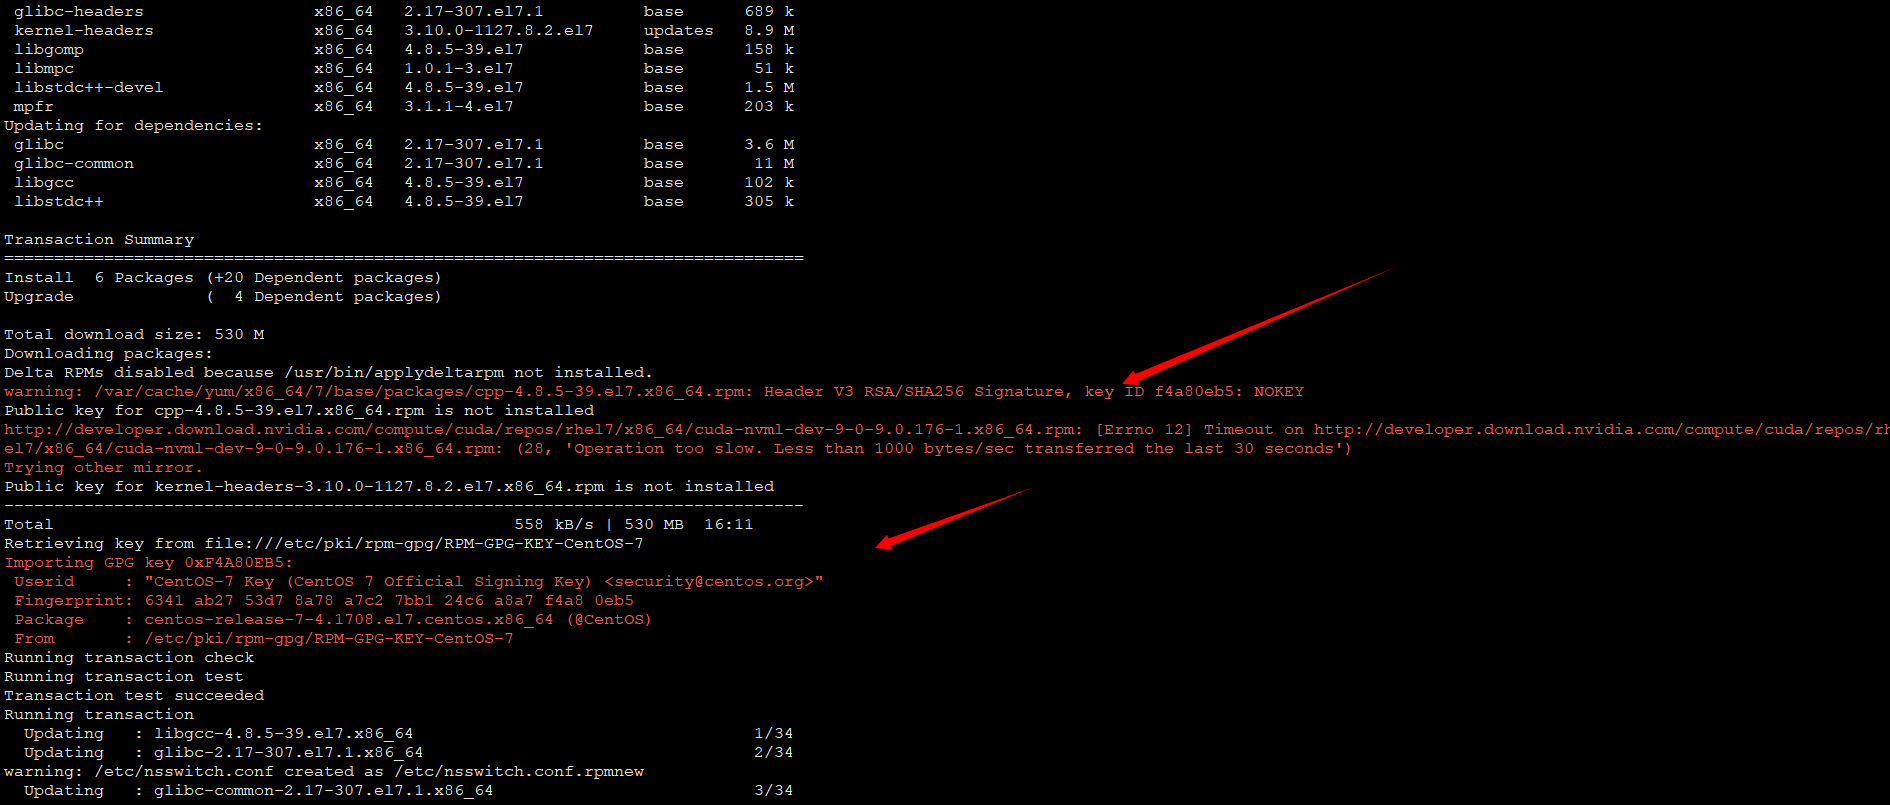 Ignore red output; it does not affect installation. If concerned, set 'gpgcheck=0' in cuda.repo and add 'rpm --import /etc/pki/rpm-gpg/RPM-GPG-KEY-CentOS-7 && ' to the last RUN command in the Dockerfile to resolve this.

1.2.7 Offline Download of CUDA Components Installed via RUN (Ignore if online build succeeds)
1.2.7.1 Offline Download of CUDA Components
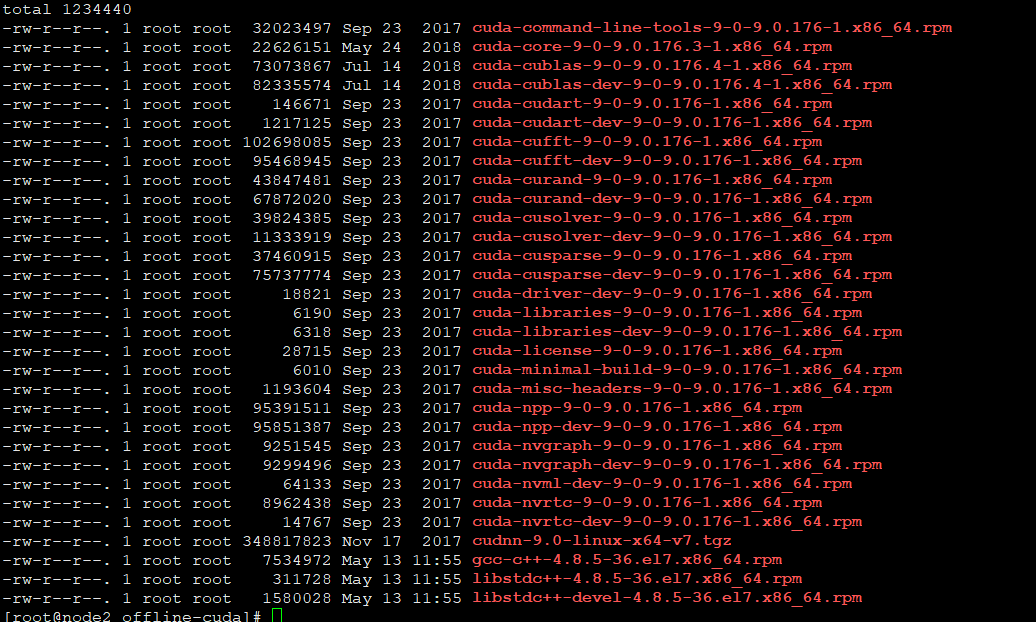
Poor network conditions during online Dockerfile builds may cause long build times or failures. You can offline download the components installed via yum in the Dockerfile RUN commands, modify the Dockerfile, and then install these components offline in the built image.
Create a new directory in Linux to download offline CUDA components:
 Execute the following command in the terminal:
CUDA_VERSION=9.0.176
CUDA_PKG_VERSION=9-0-$CUDA_VERSION-1
yum install --downloadonly --downloaddir=/home/wjy/Dockerfile/components cuda-cudart-$CUDA_PKG_VERSION cuda-libraries-$CUDA_PKG_VERSION cuda-cublas-9-0-9.0.176.4-1 cuda-libraries-dev-$CUDA_PKG_VERSION cuda-nvml-dev-$CUDA_PKG_VERSION cuda-minimal-build-$CUDA_PKG_VERSION cuda-command-line-tools-$CUDA_PKG_VERSION cuda-core-9-0-9.0.176.3-1 cuda-cublas-dev-9-0-9.0.176.4-1
1.2.7.2 Modify Dockerfile
FROM centos:centos7.4.1708
LABEL maintainer "NVIDIA CORPORATION cudatools@nvidia.com"
RUN NVIDIA_GPGKEY_SUM=d1be581509378368edeec8c1eb2958702feedf3bc3d17011adbf24efacce4ab5 && \
curl -fsSL https://developer.download.nvidia.com/compute/cuda/repos/rhel7/x86_64/7fa2af80.pub | sed '/^Version/d' > /etc/pki/rpm-gpg/ RPM-GPG-KEY-NVIDIA && \
echo "$NVIDIA_GPGKEY_SUM /etc/pki/rpm-gpg/RPM-GPG-KEY-NVIDIA" | sha256sum -c --strict -

COPY cuda.repo /etc/yum.repos.d/cuda.repo

ENV CUDA_VERSION 9.0.176

ENV CUDA_PKG_VERSION 9-0-$CUDA_VERSION-1
RUN yum install -y \
cuda-cudart-$CUDA_PKG_VERSION && \
ln -s cuda-9.0 /usr/local/cuda && \
rm -rf /var/cache/yum/*

## nvidia-docker 1.0
LABEL com.nvidia.volumes.needed="nvidia_driver"
LABEL com.nvidia.cuda.version="${CUDA_VERSION}"

RUN echo "/usr/local/nvidia/lib" >> /etc/ld.so.conf.d/nvidia.conf && \
echo "/usr/local/nvidia/lib64" >> /etc/ld.so.conf.d/nvidia.conf

ENV PATH /usr/local/nvidia/bin:/usr/local/cuda/bin:${PATH}
ENV LD_LIBRARY_PATH /usr/local/nvidia/lib:/usr/local/nvidia/lib64

## nvidia-container-runtime
ENV NVIDIA_VISIBLE_DEVICES all
ENV NVIDIA_DRIVER_CAPABILITIES compute,utility
ENV NVIDIA_REQUIRE_CUDA "cuda>=9.0"

## runtime
## RUN yum install -y \
## cuda-libraries-$CUDA_PKG_VERSION \
## cuda-cublas-9-0-9.0.176.4-1 && \
rm -rf /var/cache/yum/*

## cudnn
ENV CUDNN_VERSION 7
LABEL com.nvidia.cudnn.version="${CUDNN_VERSION}"

## online cuda
## cuDNN license: https://developer.nvidia.com/cudnn/license_agreement
## RUN curl -fsSL http://developer.download.nvidia.com/compute/redist/cudnn/v7.0.5/cudnn-9.0-linux-x64-v7.tgz -O && \
## tar --no-same-owner -xzf cudnn-9.0-linux-x64-v7.tgz -C /usr/local --wildcards 'cuda/lib64/libcudnn.so.*' && \
## rm cudnn-9.0-linux-x64-v7.tgz && \
## ldconfig

## offline cudnn
## cuDNN license: https://developer.nvidia.com/cudnn/license_agreement
COPY cudnn-9.0-linux-x64-v7.tgz /home/cudnn-9.0-linux-x64-v7.tgz
RUN tar --no-same-owner -xzf /home/cudnn-9.0-linux-x64-v7.tgz -C /usr/local && \
rm /home/cudnn-9.0-linux-x64-v7.tgz && \
ldconfig

## devel
## RUN rm -rf /usr/local/cuda-9.0/include && \
## yum install -y \
## cuda-libraries-dev-$CUDA_PKG_VERSION \
## cuda-nvml-dev-$CUDA_PKG_VERSION \
## cuda-minimal-build-$CUDA_PKG_VERSION \
## cuda-command-line-tools-$CUDA_PKG_VERSION \
## cuda-core-9-0-9.0.176.3-1 \
## cuda-cublas-dev-9-0-9.0.176.4-1 && \
rm -rf /var/cache/yum/*

ENV LIBRARY_PATH /usr/local/cuda/lib64/stubs
1.2.7.3 Enter the built base image and offline install the downloaded CUDA components
cd /home/wjy/Dockerfile/cuda9.0-wjy
## Build the image
docker build -t centos7.4-cuda9.0-cudnn7.0-base-inspur:latest .
## Mount the CUDA component directory, enter the image, and install CUDA components
docker run -it -v /home/wjy:/home/wjy centos7.4-cuda9.0-cudnn7.0-base-inspur:latest bash
## Inside the image, navigate to the CUDA component directory
cd /home/wjy/components
## Install components
rpm -ivh *.rpm --force --nodeps
## After successful installation, save the image
docker commit CONTAINER_ID centos7.4-cuda9.0-cudnn7.0-base-inspur:latest
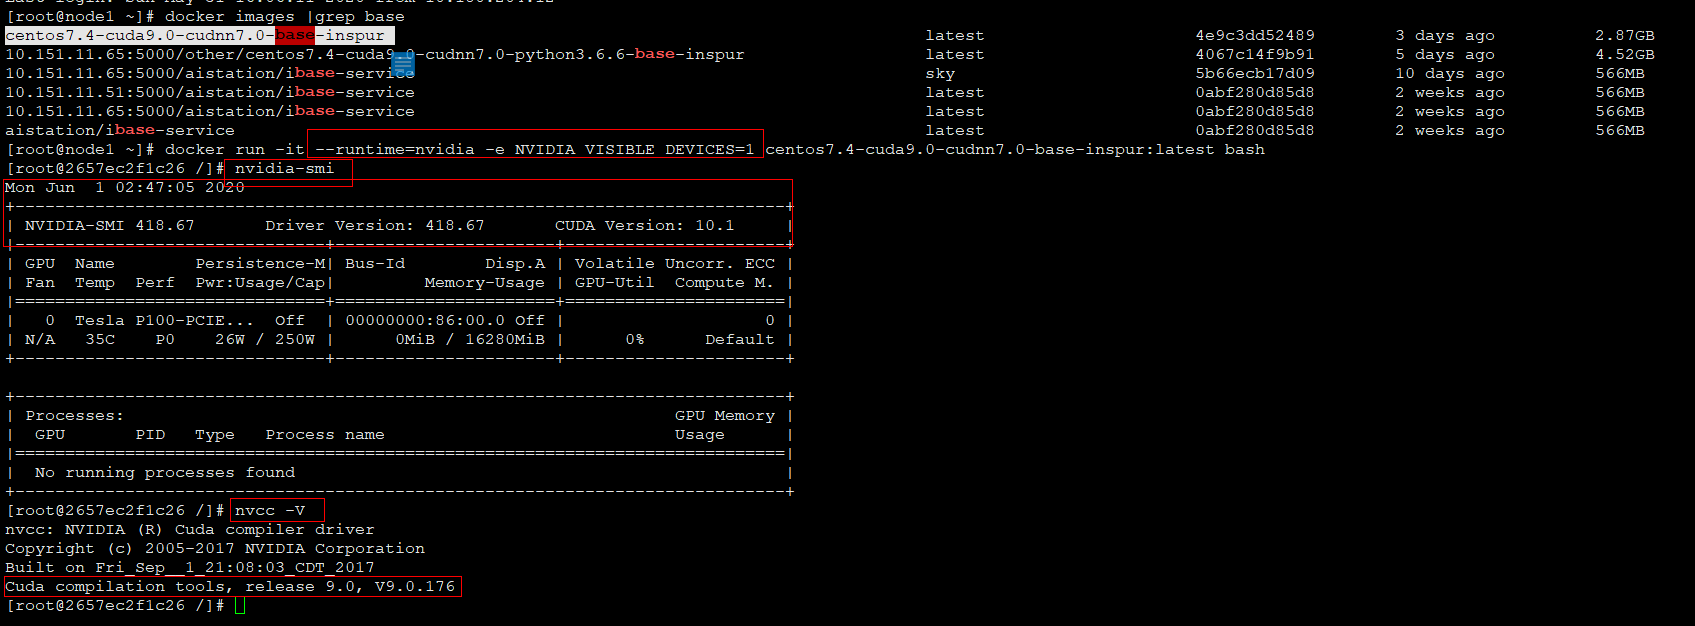
1.2.8 Verify Base Image
In an environment with GPUs, run the following command to verify:
docker run -it --runtime=nvidia -e NVIDIA_VISIBLE_DEVICES=1 centos7.4-cuda9.0-cudnn7.0-base-inspur:latest bash
2. Install components
To install components, refer to the Dockerfile example in the documentation to create a custom Dockerfile. Replace the FROM instruction with the base image created above, and execute the custom component installation commands in the RUN instruction. The Dockerfile RUN installation commands are straightforward and will not be detailed further.
Dockerfile download link: https://github.com/wjyzzu/inpsur-dockerfile/tree/main/customization/centos7.4
2.1 Install Python 3
Python offline package download URL:
https://www.python.org/downloads/source/
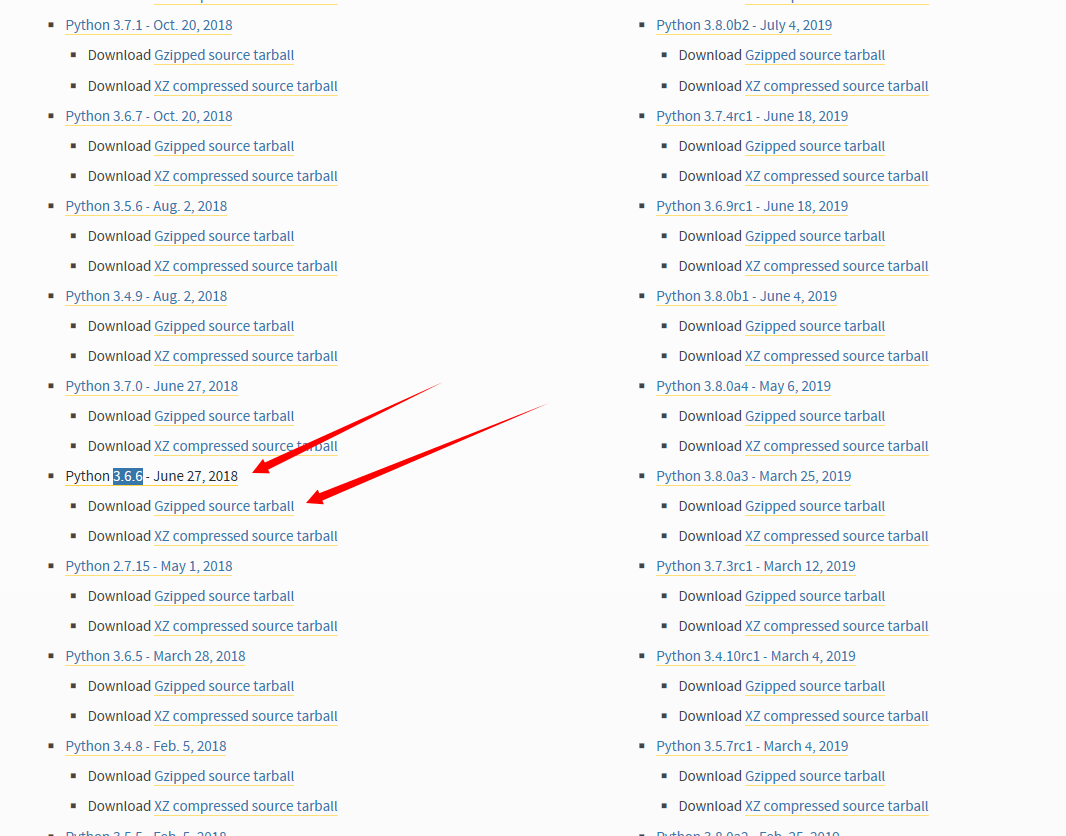
2.1.1 Download the Python 3.6.6 package on the local server:
cd /home/wjy
wget https://www.python.org/ftp/python/3.6.6/Python-3.6.6.tgz
2.1.2 Mount the /home/wjy directory to the container:
docker run -i -t -v /home/wjy:/home/wjy centos7.4-cuda9.0-cudnn7.0-base-inspur:latest /bin/bash
2.1.3 Install Python 3.6
docker exec -i -t CONTAINER_ID /bin/bash ## Enter the base image container
yum -y install make zlib zlib-devel bzip2-devel openssl-devel sqlite-devel readline-devel gdbm-devel gcc libffi-devel
tar -zxvf /home/wjy/Python-3.6.6.tgz -C /home/wjy
cd /home/wjy/Python-3.6.6
./configure
make && make install
mv /usr/bin/python /usr/bin/python27
mv /usr/bin/pip /usr/bin/pip27
ln -s /usr/local/bin/python3 /usr/bin/python
ln -s /usr/local/bin/pip3 /usr/bin/pip
2.1.4 Modify the configuration file
You can use the following shortcut command:
sed -i "s## /usr/bin/python## /usr/bin/python2.7## " /usr/bin/yum
sed -i "s## /usr/bin/python## /usr/bin/python2.7## " /usr/libexec/urlgrabber-ext-down
source /etc/profile
python -V
2.2 Install TensorFlow
TensorFlow version check and download link:https://pypi.org/project/tensorflow-gpu/1.8.0/
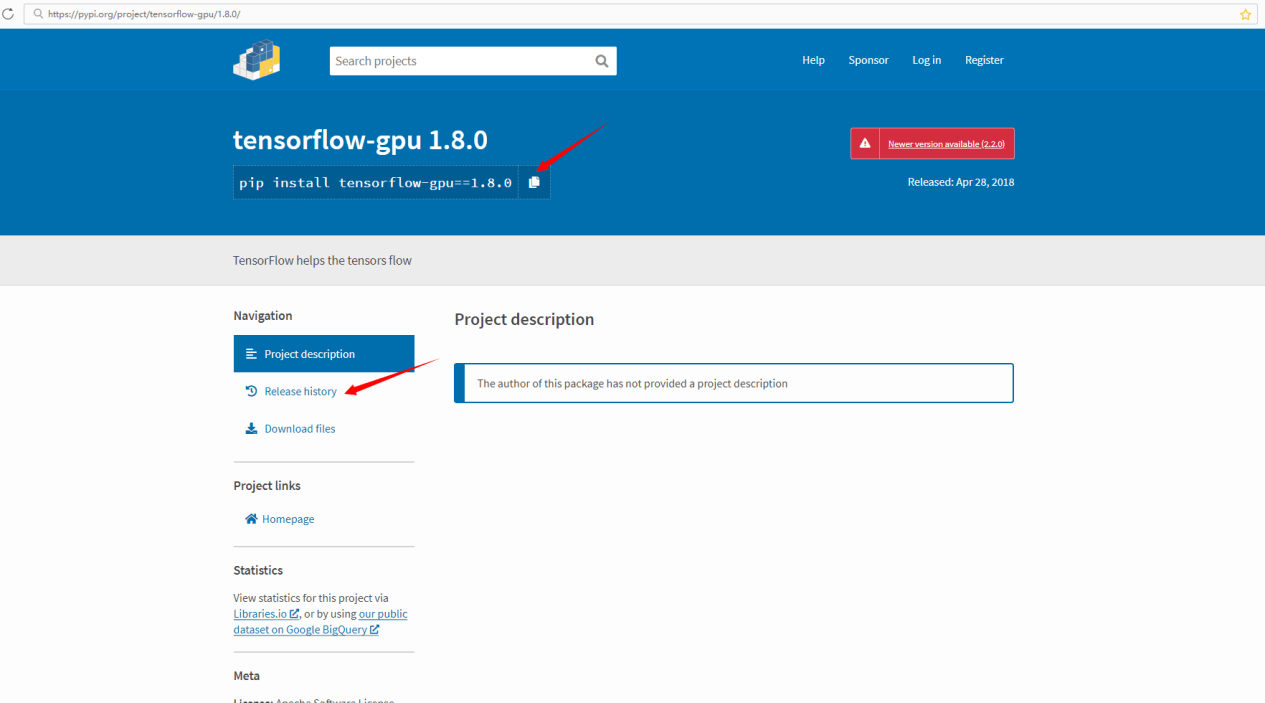 Paste the download command directly to perform an online installation in the container image, or check historical versions to find the version you want to install.
2.2.1 Installation
If online installation fails repeatedly or the network speed is too slow, you can use pip download to download the offline package and then install it.
# Online installation:
pip install tensorflow-gpu==1.8.0 --user --default-timeout=10000 --ignore-installed --upgrade
# Offline download:
pip download tensorflow-gpu==1.8.0 -d /home/wjy/tian-tan-user-images/tensorflow-gpu1.8.0

# Offline plus online installation:
pip install --find-links=/home/wjy/tian-tan-user-images/tensorflow-gpu1.8.0 tensorflow_gpu-1.8.0-cp36-cp36m-manylinux1_x86_64.whl

# Fully offline installation:
pip install --node-index --find-links=/home/wjy/tian-tan-user-images/tensorflow-gpu1.8.0tensorflow_gpu-1.8.0-cp36-cp36m-manylinux1_x86_64.whl
2.2.2 Check version
pip list |grep tensorflow
2.3 Install OpenCV
OpenCV version check and download link:https://pypi.org/project/opencv-python/3.4.3.18/
2.3.1 Installation
# Online installation:
pip install opencv-python==3.4.3.18 --user --default-timeout=10000 --ignore-installed --upgrade
# Offline download:
pip download opencv-python==3.4.3.18 -d /home/wjy/tian-tan-user-images/opencv3.4.3
# Offline installation:
pip install --find-links=/home/wjy/tian-tan-user-images/opencv3.4.3 opencv_python-3.4.3.18-cp27-cp27mu-manylinux1_x86_64.whl
2.3.2 Check version
pip list |grep opencv*
2.3.3 Install OpenCV shared libraries
Installing OpenCV via pip does not automatically install the OpenCV shared libraries. Manual installation is required; otherwise, importing cv2 in Python will result in an error. Shared libraries: libSM.so.6, libXrender.so.1, libXext.so.6
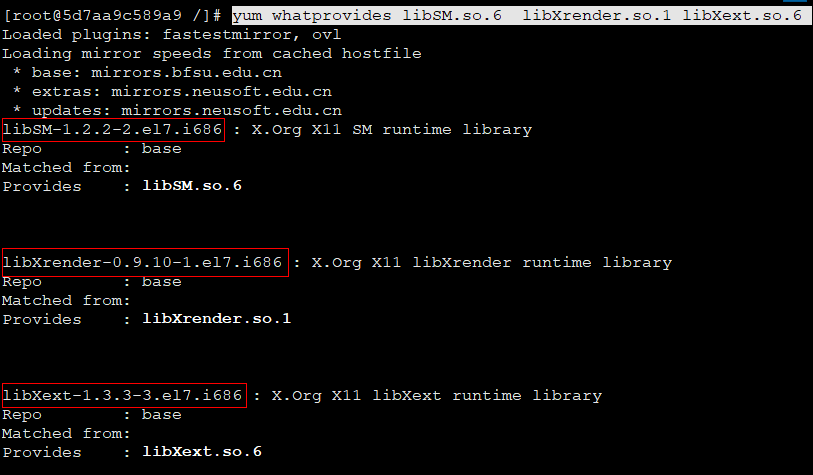
yum whatprovides libSM.so.6 libXrender.so.1 libXext.so.6
opencv1 online installation:
yum install -y libSM libXrender libXext --setopt=protected_multilib=false
Offline installation:
yum install --downloadonly --downloaddir=/home/wjy/opencv-share libSM-1.2.2-2.el7.x86_64 libXrender-0.9.10-1.el7.x86_64 libXext-1.3.3-3.el7.x86_64
## Installation
cd /home/wjy/opencv-share
rpm -ivh *.rpm --force --nodeps
2.4 Install Keras
Keras version check and download link:https://pypi.org/project/Keras/2.2.4/
2.4.1 Installation
Online installation:
pip install Keras==2.2.4 --user --default-timeout=10000 --ignore-installed --upgrade
Offline download:
pip download Keras==2.2.4 -d /home/wjy/tian-tan-user-images/keras2.2.4
Offline installation:
pip install --no-index --find-links=/home/wjy/tian-tan-user-images/keras2.2.4 Keras-2.2.4-py2.py3-none-any.whl
2.4.2 Check version
pip list |grep Keras*
2.5 Install NumPy
NumPy version check and download link:https://pypi.org/project/numpy/1.15.4/
2.5.1 Installation
# Online installation:
pip install numpy==1.15.4 --user --default-timeout=10000
# Offline download:
pip download numpy==1.15.4 -d /home/wjy/tian-tan-user-images/numpy1.15.4
# Offline installation:
pip install --no-index --find-links=/home/wjy/tian-tan-user-images/numpy1.15.4 numpy-1.15.4-cp36-cp36m-manylinux1_x86_64.whl
2.5.2 Check version
3. Configure platform-adapted components
Install the openssh, openssl, and Jupyter components according to the "Container Image Component Installation Manual". If you are building the container image using a Dockerfile, you can merge the Dockerfile content from the "Container Image Component Installation Manual" into the Dockerfile in this document, and then use the Dockerfile for online building.